
Once, I borrowed a pen drive from my friend. When I plugged it in to my computer, his name was in
the pen drive as its name. And a beautiful icon was there instead of the normal icon. I asked him the
way to do it. He told me to edit some .inf files via the note pad and many more steps. It was nice. but difficult to follow everytime. So, I wanted an easy way to Rename my Pen drive and make its icon change with one or two clicks. I used some tricks on it and found an easy way. I don't it to be only mine. Here it is just for you!
(You need WinRAR or 7zip to do this)
1. Open your note pad.
Copy and paste or type the following text ( text in red
color) part in your note pad.
[autorun]
icon=LOGO_icon.ico
label=RäiñÐrøþ™®
In here, "label=RäiñÐrøþ™®" refers to the USB drive name. So replace it with your own name that you wants to appear on your USB Drive.
Then, press Crtl+S open the "Save as" window. Save it as "Autorun.inf". Remember not to save it in normal "txt" file type. Save it in a new folder.
2. Choose your icon. Rename it as "LOGO_icon.ico"
Copy and paste it in the folder that you saved the
Autorun.inf file.
3. Open a new Note pad.Copy and paste or type the following text ( text in red color) part in your note pad.
[ExtShellFolderViews]
{BE098140-A513-11D0-A3A4-00C04FD706EC}=
{BE098140-A513-11D0-A3A4-00C04FD706EC}
[{BE098140-A513-11D0-A3A4-00C04FD706EC}]
Attributes=1
IconArea_Image=fbl.jpg
[.ShellClassInfo]
ConfirmFileOp=0
Save it in the same folder as "desktop.ini".
4. Copy the image that you want to show as your folder background in to the same folder and rename it as "fbl". Remember that the image should be in JPEG format.
5. Open your folder.
6. Select the icon, autorun.inf, image & desktop.ini files once.
7. Right click and select WinRAR > Add to Archive...
8. Then type a Name for your setup and tick the check box on "Create SFX Archive".
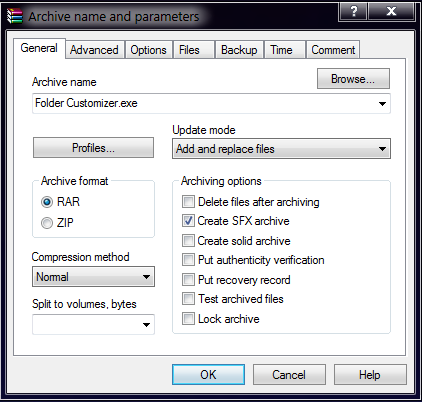 |
| Click on the image to zoom |
9. Click OK.
10. Copy and paste the your setup file in to your USB drive and open it. When it asks to install, Click Install without changing the directory. Unplag and replug your USB drive! See! You are DONE!
Thank you.
Stay with us for more...
No comments:
Post a Comment